
| -========= | REZKONV-Recipe – RezkonvSuite v1.4 :  |
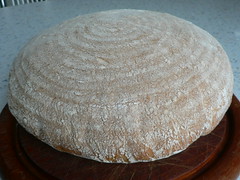
| Title: | French Country Bread – Whitley |
| Categories: | Bread, Wheat sourdough |
| Yield: | 1 Large loaf |
 |
 |
Ingredients
| H | STAGE 1: REFRESHING THE LEAVEN | ||
| 160 | grams | Wheat leaven Starter (87,3 % Hydration) | |
| 50 | grams | Stoneground wholemeal flour | |
| 150 | grams | Strong white flour | |
| 120 | grams | Water | |
| H | STAGE 2: MAKING THE FINAL DOUGH | ||
| 100 | grams | Stoneground wholemeal flour | |
| 300 | grams | Strong white flour | |
| 7 | grams | Sea salt | |
| 300 | grams | Water | |
| 300 | grams | Production Leaven (from above)* | |
Source
 * * |
Bread Matters: The State of Modern Bread and a Definitive Guide to Baking Your Own<* ISBN: 0-00-720374-8 |
| Edited *RK* 06/04/2007 by | |
| Ulrike Westphal |
Directions
Stage 1: Mix everything together into a fairly firm dough at about 27°C. If your starter was very wet, you may need to add a little more flour at this stage. Cover and leave in a warm place for 4 hours. In very warm weather, this period of refreshment may need to he reduced to 3 hours or even less. The production leaven is ready when it has expanded appreciably but not collapsed on itself.
Stage 2: Mix a dough with all the ingredients except the refreshed production leaven. Make the dough pretty soft and aim for a temperature of about 28°C. Knead until the gluten is making itself felt and the dough is becoming smooth and elastic. About 8-10 minutes of vigorous action should see some changes. Then add the production leaven and work it into the dough until it is smooth. At this stage, the softness of the dough can be adjusted by additions of water – or flour. If you are going to prove this dough in a basket, do try to keep it very soft. Even at the end of kneading (after another few minutes), the dough should not be so dry that it does not stick to your hands or the bench.
Smear some water over a clean area of worktop and lay your dough down on it, covering the whole thing with a clean upturned bowl whose inside rim has also been moistened with water. Wait an hour, (luring which time the gluten will relax and soften and the yeasts will begin to aerate the bubble structure inside the dough. Then, with wet hands and a couple of plastic scrapers, stretch and fold the dough. With one scraper in each hand, slip them under the middle of the dough, gently prising it from the table if it has stuck. Lifting the dough very slightly, stretch it away from you as far as it will go without forcing it and then fold it back on itself and let it rest on the main body of dough. Do this again, this time getting hold of the `front‘ part of the dough piece and pulling it towards you before folding it back on _ :, main body of dough. Repeat the action, stretching the dough to your right and then finally to your left. You should end up with a tighter, more vertical pile of dough. The object of this folding action is to thin the gluten membrane by stretching it, allowing a greater subsequent expansion of the dough, at the same time squeezing as little gas out of it as possible.
Have a howl of wholemeal flour ready. Pick the dough up and dip it gently in the flour, turning it over to ensure that it gets completely covered. Then transfer it to a floured proving basket with the seam (or more ragged) side of the dough facing upwards. Cover the whole basket with a large polythene bag, inflated so that it cannot touch the dough, and put it in a warm place to prove for 3-5 hours.
When it looks as though it has expanded a fair amount, test the dough with gentle finger pressure. This dough is going to he subjected to some indignity when you turn it out of its basket on to a baking tray, so it is best not to let it prove until it is fully aerated and quivering like a jelly. It is ready to be baked when an indentation made by your finger disappears fairly slowly, indicating that the pressure of gas in the dough may he passing its peak.
Line a baking tray with baking parchment. Invert the basket with a fairly quick action but be careful not to clatter the dough on to the baking tray – or you may hear a reproachful sigh as gas escapes from the ruptured loaf. Make 2 or 3 cuts in the top of the loaf and then put it into an oven preheated to about 220°C. Reduce the heat to around 200°C after about 10 minutes. Bake for about 40 minutes to ensure a good, deeply coloured, firm crust.
Variations
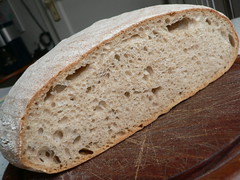
· Instead of strong white flour, try using some plain flour (perhaps from English wheat) to change the quality of the gluten in the dough. If you can get hold of a French T65 or TI 10, or an Italian-style ciabatta flour, these may also provide the kind of very extensible but not very strong gluten that is ideal for French Country Bread. The effect of using weaker flour may be to make the crumb structure more random. The wetter the dough, the chewier the crumb will be.
· Try substituting 50 g wholemeal rye flour for the same weight of white flour in the production leaven. Even a small amount of rye can assist the production of gluten-ripening substances and contribute to extra moistness in the crumb.
*The remaining 180 g or so of refreshed production leaven goes hack into the pot and becomes the `old starter‘, to he kept for another cycle of refreshment and breadmaking. For advice on looking after your starter, see `What do I do with my sourdough between baking sessions?‘
=====
*=Affiliate-Link zu Amazon
Thyme for Cooking
That is a beautiful loaf of bread, Ulrike. I am so jealous!